RTB End-Point creation
Basic settings
To create a new RTB campaign go to the Advertisers section, choose the advertiser/demand partner and click button.

Fill in the name of your new ad campaign in the Campaign name field (1) and choose Open RTB as the Integration type (2). You can enable or disable the campaign via Status (3) in the upper right corner and add the endpoint URL from your demand partners for the campaign (4).The fields below can be used to distribute traffic by data centers if the advertiser requires it. Sensitive Demand (5) toggle, when enabled, gives you an ability to “lock” specific campaign of being selected in the Align Demand tab. According to that, supply can be aligned only from the inside of this entity. For instance, you have “locked” campaign #123456, hence it won’t be displayed in the Align Demand in source settings, even if it suits pre-filters picked. Supply can be connected to this campaign only from the Align Supply tab in this campaign’s settings.
Cookie Sync Settings
Cookie sync initiator (1) defines who will be the initiator of user synchronization and who is to keep the match base.
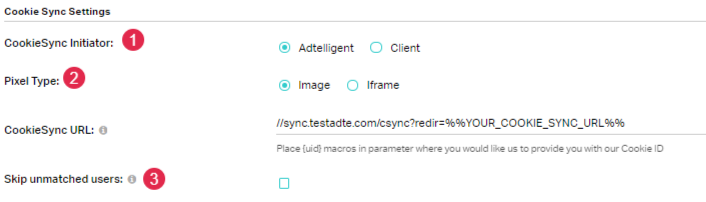
If Adtelligent is chosen, we will initiate the cookie syncing process while your advertiser is going to store the match base. You need to put your advertiser’s syncing pixel after the “redir” parameter contained in the generated URL. Place the {uid} macro in a parameter where you would like us to provide you with our user id.
Example:
URL generated on Adtelligent:
//sync.adtelligent.com/csync?redir=%%YOUR_COOKIE_SYNC_URL%%
Pixel you got from partner:
https://sync.anyadserver.com/csync?p=456787654&user_id=%%USER ID FROM ADTELLIGENT%%
The macro Adtelligent uses to pass the user ID: {uid}
To make the cookie syncing work:
-
Encode partner’s pixel URL along with our user ID macro contained: https%3A%2F%2Fsync.anyadserver.com%2Fcsync%3Fp%3D456787654%26user_id%3D%7Buid%7D%20
-
Compile the pixels: //sync.adtelligent.com/csync?redir=https%3A%2F%2Fsync.anyadserver.com%2Fcsync%3Fp%3D456787654%26user_id%3D%7Buid%7D%20
If Client is chosen, Adtelligent will keep the match base, while advertiser will initiate the syncing process (their pixel will redirect to ours). If they provide you with the user id macro, insert it after “extuid” parameter. Generated in the CookieSync URL field, link should be encoded and put after the “redirect” parameter in the partner’s pixel. Hence, in the end, demand partner would pass us their user id.

URL generated on Adtelligent:
https://sync.adtelligent.com/csync?t=a&ep=0&extuid={UID_to_pass_the_user_id} (should be encoded to work properly)
Pixel you got from partner:
//sync.adserver.com/user_sync?redirect={Adtelligent’s_pixel_should_be_placed_here}
The macro adserver uses to pass the user ID to us (sample): {csync_uid}
To make the cookie syncing work:
- Encode the our URL along with the partner's user ID macro: https%3A%2F%2Fsync.adtelligent.com%2Fcsync%3Ft%3Da%26ep%3D2718578948%26extuid%3D%7Bcsync_uid%7D
- Compile the pixels:
https://sync.adtelligent.com/csync?t=a&ep=0&extuid=https%3A%2F%2Fsync.adtelligent.com%2Fcsync%3Ft%3Da%26ep%3D2718578948%26extuid%3D%7Bcsync_uid%7D
Pixel type (2) defines the way this cookie sync would be requested: Image or iframe. Skip unmatched users (3) option allows to filter all the incoming requests made to campaign without a cookie.
Open RTB Settings
Open RTB settings section allows you to configure all features related to OpenRTB standard.

Auction price type (1). There are two available types: First Price and Second price. First Price auction is the type of auction where the bidder that offers the highest price wins. For instance, advertiser "A" bids $1, advertiser "B" bids $1.50, thus the latter wins the auction. In case of Second Price auction, the winner is the bidder that offers the highest price, but for them, it only takes to overbid the second highest price offered. For instance, advertiser A bids $1, advertiser B bids $1.50 and advertiser C bids $2.00, thus the latter wins the auction, paying the second highest bidder price - $1.50 + some fee (usually $0.01).
Notification URL processing (2). There you can choose the method of notification URL processing. There are five options available: normal, ignore, impression, do not wait and opportunity.
-
Normal - all RTB demand partners provide us with the list of campaigns eager to display the ad on a specific domain. The best performing campaign is being chosen by all parties. We send a confirmation request to the server (campaign) that won the bid. That campaign responds to our Video SSP with a confirmation and the ad is being displayed.
-
Ignore - all RTB demand partners provide us with the list of campaigns eager to display the ad on a specific domain. The best performing campaign is being chosen by all parties. We send a confirmation request to the server (campaign) that won the bid but we show the ad without a confirmation in return.
-
Impression - all RTB demand partners provide us with the list of campaigns eager to display the ad on a specific domain. The best performing campaign is being chosen by all parties. We send a confirmation request to the server (campaign) that won the bid. The campaign (RTB demand server) is being informed about the impression in the response after the ad starts.
-
Do not wait - all RTB demand partners provide us with the list of campaigns eager to display the ad on a specific domain.The best performing campaign is being chosen by all parties. We show the ad without sending a confirmation request to the campaign that won the bid.
-
Opportunity - all RTB demand partners provide us with the list of campaigns eager to display the ad on a specific domain. The best performing campaign is being chosen by all parties. We send a confirmation request to the server (campaign) that won the bid. The campaign (RTB demand server) is being informed about the ad opportunity in the response after the ad starts.
X-Openrtb version header (3). Select your X-Openrtb version header. Four variants available:
-
OpenRTB 2.2
-
OpenRTB 2.3
-
OpenRTB 2.4
-
OpenRTB 2.5
Demand type (4). Using these checkbox, you can pick the type of demand that is going to be sent to this campaign. It can be either video or display or both.
PMP (5). Private Marketplace option allows you to send requests to the specific Demand on the advertiser’s ad server. More here

When you tick the PMP checkbox, several new fields appear, where:
-
Deal ID conveys the specific deals applicable to this impression.
-
Wseat stands for whitelist of buyer seats (e.g., advertisers, agencies) allowed to bid on this deal. IDs of seats and the buyer’s customers to which they refer must be coordinated between bidders and the exchange a priori. Omission implies no seat restrictions.
-
Private auction indicates auction eligibility to seats named in the Direct Deals object, where 0 (checkbox unticked) = all bids are accepted, 1 (checkbox ticked) = bids are restricted to the deals specified and the terms thereof.
Flighting allows you to target specific delivery start and end dates for advertisers campaign, to make it active for a certain period of time. If there is no need to run it within a defined period, you may tick checkboxes Start Now and Run Indefinitely. Please, double-check the start date and the end date of your end campaign, if you use the specific time range before you save the Campaign.
Advanced Settings
Looking into Advanced settings, Delivery allows you to limit the volume of Impressions, a particular advertiser/demand partner will receive along with the overall volume of incoming Ad Requests and Ad Opportunities coming from the publishers' inventory mapped to those campaigns. The volume of Ad Requests, Ad Opportunities and Impressions can be limited by specific time periods: daily (per 24 hours) and hourly. QPS (query per second) parameter allows you to control the number of requests sent to the campaign in a second from the bidders added along to the waterfall. Currently, the minimum value for QPS per campaign is 100, the maximum amount is limited by your Personal Manager. The inbound amount of QPS can be spread between your RTB campaigns.
In Targeting section you are able to set different targeting options for your campaign. This feature allows you to target your audience by domains, browsers, languages, IPs and countries.
The wider targeting abilities are hidden under button (6). When clicking on it, a new tab with more detailed targeting appears.
To have it added to the settings, simply tick on the "plus" button and then "Save". Selected targetings will appear in your UI.
The section with player sizes allows you to add specific sizes and limit your Demand Campaign only with relevant traffic.
There is also 3rd party trackers option available so that your advertisers can easily track the events and traffic that is coming to the campaigns. It can also be used for scoring pixels insertion and limitation of scans with the % mentioned the in traffic score field.
Align Supply
To finish the creation of the Campaign, don't forget to align supply to the Campaign. To have it done, go to the Align Supply tab (1), use pre-filtering zone to pick required supply and select sources using the tick buttons on the left (2). Once done, the button (3) will appear and let you align the supply to created campaign.